Some users may not be able to see thumbnail previews on a Windows 11 computer.
And, the old method of enabling thumbnail previews may not be working on the Windows 11 computer. In other words, thumbnails may be missing from your Windows 11 computer. But, this issue can be resolved with a quick configuration change on the Windows 11 computer.
(This post has been updated on June 20, 2024, please leave a feedback if the instructions do not work)
To enable image previews or thumbnails on Windows 11 folder, please follow the instructions below:
- Open the folder for which you need image thumbnails
- Right click within the folder to bring up the context menu
- Choose ‘Properties’ from the context menu
- Choose ‘Customize’ from the tab options
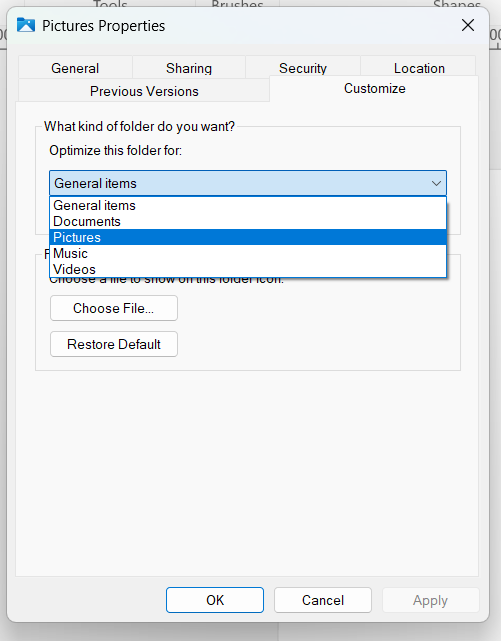
- Choose ‘Optimize this folder for’ and choose ‘Pictures’ from the drop down menu.
For your benefit, all the steps have been performed and displayed in the screenshots below.
We will use the Windows file explorer to bring up the folder and its context menu.
For the purpose of this example, we will enable thumbnails for the default ‘Pictures’ folder.
- Press the Win Key + X + E to launch the file explorer on a Windows 11 computer. An alternate way to open the file explorer would be through the task manager. Open the task manager, and load the file explorer on the Windows 11 computer.
- We want to generate image thumbnails for the ‘Pictures’ folder. So, we choose the ‘Pictures’ folder. Remember, this is the default ‘Pictures’ folder. Double-click on the folder name or icon to open the ‘Pictures’ folder.
- Right click within the folder to bring up the context menu. You will load the context menu popup on the screen. A screenshot of the context menu is given below. Move to the ‘Properties’ tab of the ‘Folder Options’.
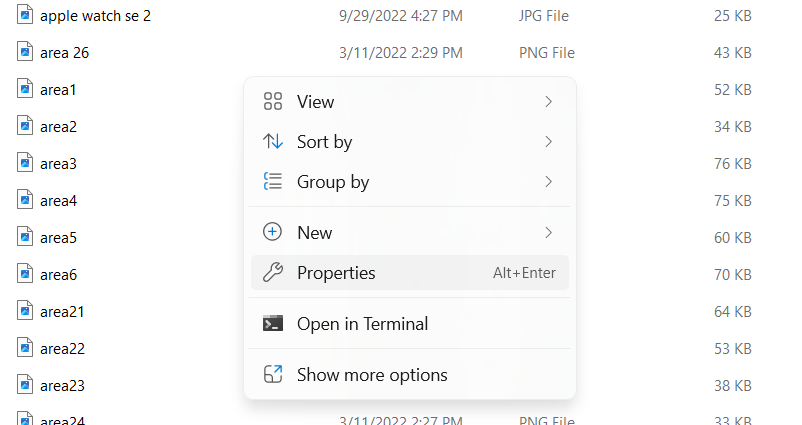
- From the context menu, choose ‘Properties’. It will take you to the screen displayed below.
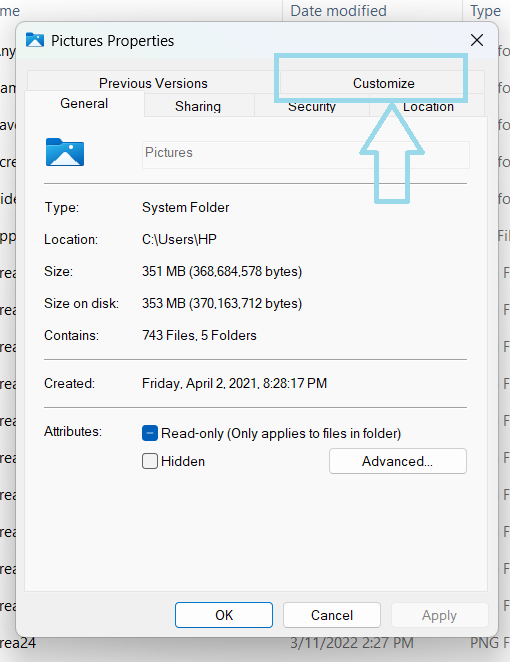
- Now, select the ‘Customize’ option from the available tab options. The same has been highlighted in the screen displayed above.
- Once you are in the Customize tab, you will see a screen displayed below. Choose the option of ‘Pictures’ under the ‘Optimize this folder’ dropdown.
- Click on ‘Apply’ to apply your changes.
- The ‘Pictures’ folder will show the image thumbnails now.
If you need image thumbnails to be enabled for any folder, repeat the same process in the folder:
- Click the folder name
- Right-click within the folder to bring up the context menu
- From the context menu, choose ‘Properties’.
- Within the ‘Properties’ panel, choose the ‘Customize’ tab.
- Now, choose the option that states – ‘Optimize this folder for’ – ‘Pictures’. The ‘Pictures’ option will be in the drop down menu.
If you do it the first time, the entire exercise may take 5 minutes. The process has been simplified by Microsoft over the past couple of years. And, the revised process is more user-friendly.
Summary
You can enable thumbnails on a Windows 11 computer using the following preferred method:
- You can enable the thumbnails through the folder options.
You could any of these methods to enable thumbnails on a Windows 11 computer for a specific folder or for the entire computer.
Simplifying technology, one step at a time.